CONTACT PHONE 816-380-4747
OPEN HOURS

Mon - Fri 8:00AM - 5:00PM Central

ADDRESS

1150 SE Hamblen Rd, Lee's Summit, MO 64081

How to Choose Gray Concrete for Your Project

Gray concrete can look quiet on a sample board and surprisingly bold across a driveway or interior floor. Its appearance shifts with cement, aggregates, pigments, water content, finishing, and light. A cool gray beside white siding may feel crisp; the same mix under warm evening light can seem softer. Small samples help, but they cannot fully predict a large pour. That is worth remembering.

Choosing the right gray starts with the project’s purpose. A patio, garage slab, and polished indoor floor face different demands. Consider expected traffic, exposure to rain or freeze-thaw cycles, drainage, maintenance, and the desired surface texture. When comparing grays concrete options, treat each shade as a specific mix-and-finish combination, not a universal color. Ask suppliers for mix details and review cured samples made with comparable materials and finishes. View them at different times of day. If color consistency matters, confirm the batching and placement plan with your contractor. A few shades can vary between pours. Honestly, this is easy to underestimate.

The best choice is not always the darkest or most uniform option. Compare samples with nearby stone, paint, or paving, and check them both dry and damp. Keep a record of the sample, finish, and product details you approve. Discuss sealing only after understanding the finish and care requirements; sealers can change sheen and perceived color. Reliable decisions come from matching appearance with performance, then checking details before work begins. Gray concrete rewards careful planning, though real surfaces will still show natural variation.
How to Choose Gray Concrete for Your Project

Define the Project’s Functional and Visual Requirements

Define performance before choosing a gray shade. A driveway needs abrasion resistance, drainage, and freeze-thaw durability; an interior floor may need tighter flatness and easier cleaning. Record expected loads, exposure, and finish requirements before requesting a mix. NRMCA’s Concrete in Practice 35 explains that compressive strength is commonly assessed with cylinder tests at 28 days. That figure is a test age, not a promise that every placement will perform identically. Ask the supplier to confirm the specified strength and exposure requirements, then review test results with the project professional.

Color needs its own criteria. Gray can shift with cement and aggregate sources, water content, curing, and surface finishing. A smooth troweled area may look darker than a broom-finished one, even when both use the same mix. ACI 302.1R-15 treats floor flatness and levelness as measurable properties, not just visual impressions. Request a sample panel using the intended mix and finish, and inspect it in the project’s actual light. Small differences matter. Note the sample’s curing conditions; a rushed comparison can mislead. I would also specify an acceptable color range rather than demand a perfect match, since concrete is not painted metal. Keep the approved sample on site for comparison during placement.

Compare Gray Concrete Types, Finishes, and Color Options

Gray concrete is not one fixed color. Poured-in-place mixes suit slabs and driveways, while precast panels offer more controlled dimensions and surface consistency. Standard gray often looks cooler in shade and warmer in direct sun. Cement color, sand, aggregate, and pigment can all shift the final tone. Compare samples outdoors, not only under showroom lights.

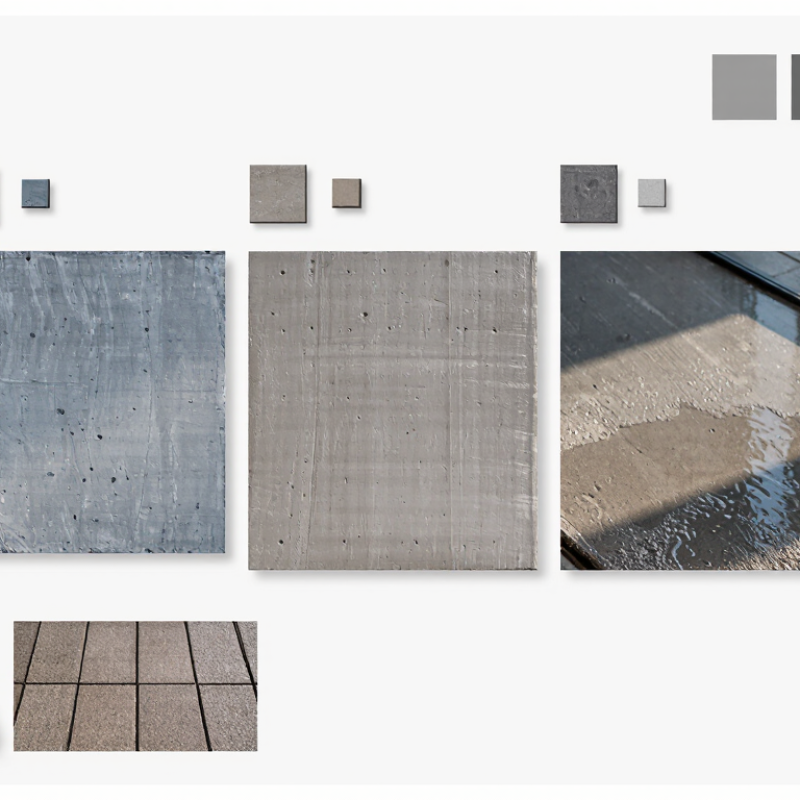
Finishes change both appearance and use. A broom finish adds texture and grip for walkways; a smooth trowel finish looks cleaner but may show marks. Exposed aggregate reveals stones, creating a varied, tactile surface. Polished concrete brings out subtle tonal differences and works well indoors. For exterior areas, consider drainage and slip resistance alongside appearance. A small sample can still mislead: full pours may vary slightly between batches.

Tips: Ask for cured samples made with the proposed mix and finish. View them beside nearby brick, wood, or landscaping. Keep a reference sample on site, and confirm acceptable color variation before placement. Gray can be pleasantly imperfect. That is part of its character.

How to Choose Gray Concrete for Your Project

The chart compares indicative compressive-strength ranges by concrete type. Actual values depend on the mix design, materials, and project specifications; confirm requirements with your concrete supplier or engineer.

Choose the finish for the surface and its use: a troweled finish is smooth, a broom finish adds traction, and exposed aggregate reveals the stone. Gray shades also vary with cement, aggregates, curing, and lighting. For a consistent color, review a sample made with the proposed mix and finish.

Evaluate Site Conditions, Durability, and Maintenance Needs

Gray concrete should be chosen with the actual site in mind, not from a small indoor sample alone. Sunlight can make a cool gray look pale, while wet conditions may deepen its tone. Test it outdoors. Check the sample beside nearby brick, stone, or siding, and view it in morning and afternoon light. Also note drainage, soil movement, and exposure to freeze-thaw cycles or deicing salts. A shaded path that stays damp has different needs from a covered patio. Small details matter.

Durability depends on the mix, placement, curing, and finish, not color alone. Ask the contractor for specifications suited to local weather and expected use. For a driveway, confirm the design accounts for vehicle loads and proper base preparation. A textured finish can improve grip, though rough surfaces may collect dirt more readily. Sealer may help reduce staining, but it can change the gray’s appearance and requires periodic renewal. Test it outdoors. Sweep grit regularly, clean spills promptly, and avoid harsh cleaners unless the product guidance permits them. I would not treat a sealer as a cure for poor drainage or weak installation. Compare maintenance instructions before deciding; some attractive finishes demand more care than a busy household can realistically provide.

How to Choose Gray Concrete for Your Project — Evaluate Site Conditions, Durability, and Maintenance Needs

Site Conditions Suitable Gray Concrete Approach Specification Checks Durability Considerations Maintenance Needs Gray Color and Finish
Interior floor with light foot traffic
Dry, enclosed space such as a basement or utility room.
Standard gray concrete slab with a troweled or lightly textured finish, selected for the intended use. Confirm subgrade preparation, slab thickness, reinforcement requirements, joint layout, and any flooring or coating compatibility. Protect the slab from excess moisture during placement and curing. Plan control joints to help manage shrinkage cracking. Routine sweeping and damp mopping are usually sufficient. Use a compatible sealer if stain resistance is needed. Gray tone can vary with cement, aggregates, water content, curing, and finishing. Approve a sample if appearance matters.
Exterior paving in a freeze–thaw climate
Walkways, patios, or driveways exposed to rain, freezing temperatures, or deicing salts.
Air-entrained exterior concrete designed for the applicable exposure conditions, with a suitable slip-resistant finish. Check local code requirements for exposure class, air entrainment, strength, water-to-cementitious-materials ratio, drainage, and joint spacing. Good drainage and appropriate air entrainment help reduce freeze–thaw damage. Avoid excessive finishing or adding water at the surface. Remove leaves and standing water. Use deicing products cautiously and follow local guidance; reseal only when appropriate for the finish. A light broom finish is commonly used for traction. Weather and curing conditions can affect surface shade and uniformity.
Driveway or service area with vehicle traffic
Repeated loading, tire wear, and possible exposure to oil or road salts.
Concrete proportioned for the expected loads and exposure, with a durable, textured surface finish. Provide the engineer or supplier with vehicle types, traffic frequency, subgrade details, drainage, and any heavy or concentrated loads. Subgrade support, slab design, joint placement, and proper curing are important to limit cracking and surface wear. Clean oil and chemical spills promptly. Inspect joints and cracks; maintain sealant where it is specified. Natural gray is practical, but tire marks and spills can remain visible. A consistent finishing process helps achieve a more even appearance.
Coastal or chloride-exposed area
Concrete subject to sea spray, saltwater, or frequent chloride exposure.
A low-permeability concrete mix designed for the applicable chloride exposure; protect reinforcement with project-specific detailing. Confirm exposure requirements, cover to reinforcement, mix design, curing procedures, and any supplementary cementitious materials with the project professional. Reducing the entry of water and chlorides can help protect reinforcing steel. Cracks and poor drainage can increase exposure. Rinse salt deposits from accessible surfaces when practical. Repair deteriorated joints or cracks using compatible materials. Supplementary cementitious materials may influence the final shade and early-age color. Review a sample when color consistency is important.
Interior floor intended for polishing
Retail, office, or residential space where the slab remains visible.
Concrete planned and placed for polishing, with appropriate aggregate exposure and a controlled finishing process. Coordinate slab flatness, joint locations, aggregate exposure, curing, and polishing expectations before placement. Polishing improves cleanability but does not correct structural problems or guarantee a uniform color. Protect the surface during construction. Use a neutral-pH cleaner and suitable maintenance pads. Reapply a compatible stain guard if the maintenance plan calls for it. Aggregate distribution, patching, and natural batch variation remain visible. A representative mock-up helps set expectations.
Exposed slab where appearance is a priority
Architectural walls, steps, or paving with visible gray surfaces.
Use a controlled mix and consistent placement, formwork, curing, and finishing methods; consider gray pigments only when a defined color is required. Specify acceptable color variation, surface texture, form-tie or joint patterns, repair methods, and a sample panel. Choose a finish and mix suitable for the actual exposure. Aesthetic requirements should not replace structural or durability requirements. Clean with methods compatible with the finish. Test sealers on a sample because they may change the surface sheen or apparent color. Natural gray is not a single fixed color. Cement source, aggregates, moisture, curing, and surface treatments all affect appearance.

Project note: Final mix proportions, strength, reinforcement, exposure classification, and curing requirements should be set by the project engineer or concrete supplier to meet local codes and actual site conditions.

Review Samples, Specifications, and Supplier Qualifications

How to Choose Gray Concrete for Your Project

Gray concrete can look cool, warm, or almost beige depending on cement, aggregates, lighting, and curing. Ask for samples made with the proposed mix, not just generic color chips. View them outdoors and indoors, both dry and damp. Look at them beside the actual brick, stone, or paint they will meet. Small differences matter. A small sample still cannot show every variation across a large pour, so request a full-size mockup when color consistency is critical.

Review the specifications before comparing quotes. Confirm the required strength, exposure conditions, finish, slump, and any limits for color variation. Ask how the mix will be adjusted for site conditions, and whether added water could affect performance or appearance. Put acceptance criteria in writing, including who approves the mockup and when. Gray concrete is not a uniform paint color; even careful checks cannot remove every variation. It is better to acknowledge that early than promise a perfect match.

Check whether the supplier can provide mix documentation, recent test results, and clear delivery procedures. Ask how batches are tracked and how delays or weather changes are handled. References for similar projects can help, especially when the finish is exposed. A low quote may omit testing or careful coordination, so compare the full scope. I would still ask one more question: who will be available on pour day to resolve a mismatch? A capable supplier should answer plainly and explain what they cannot guarantee.

Confirm the Budget, Installation Plan, and Quality Checks

How to Choose Gray Concrete for Your Project

Confirm the Budget, Installation Plan, and Quality Checks

Set the full budget before choosing a shade. Include excavation, base preparation, forms, delivery, pumping, finishing, joints, curing, and any sealer. Ask for a written mix specification and a small sample using the intended cement and aggregate. Gray can shift with water content, curing, and local materials. A sample helps, but it is not a promise. I have seen expectations drift when the site mix differs from the showroom sample.

Plan the pour around access, weather, and crew size. Mark where trucks can stop and where washout will be managed. Agree on finish, joint locations, and who checks the surface before placement. NRMCA’s CIP 11 guidance recommends keeping ordinary Portland-cement concrete moist for at least seven days, unless the mix or project specification supports another curing period. That affects scheduling, protection, and labor costs. Keep delivery tickets and note weather, placement time, and curing steps.

Tips: Approve a site mockup, then check it in morning and afternoon light. Confirm the delivered mix matches the approved specification. Look for consistent finish, clean edges, and planned joints. Small differences happen; document them before accepting the work.